Blocking Time Off on the Calendar in RouteX: A Step-by-Step Guide
In RouteX, it’s easy to block time off on your calendar to prevent scheduling claims during personal appointments or unavailable periods. This guide will walk you through the process of marking personal time on your calendar, ensuring that your schedule remains clear for other commitments. Whether you need to block off a few hours or an entire day, RouteX makes it simple to manage your availability.
Benefits of Blocking Time Off on the Calendar:
Ensures no claims are scheduled during unavailable times.
Helps you manage personal commitments, appointments, or vacations.
Keeps your calendar organized and prevents overbooking.
Step-by-Step Process for Blocking Time Off
Here’s how to block off time on your RouteX calendar:
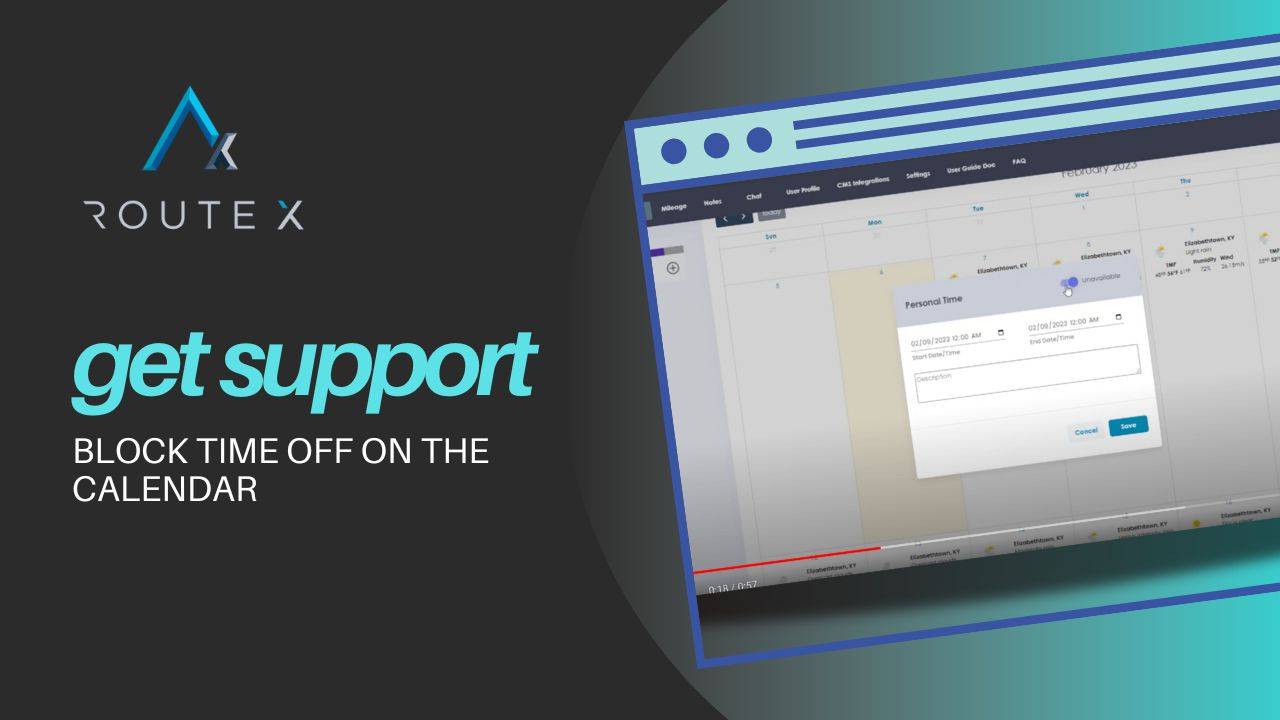
1. Click on the Calendar
Navigate to the specific day when you want to mark time off. Simply left-click on the date in the calendar where you need to block time.
2. Mark Time as Unavailable
Once you click on the date, a Personal Time window will pop up. You’ll see a switch labeled Unavailable—toggle this switch to block the selected time.
3. Enter the Time and Reason
Set the start and end time for your personal time. For example, if you have a doctor’s appointment from 9:00 AM to 10:00 AM, enter those times in the fields provided. You can also add a note to remind yourself of the reason for the blocked time, such as “Doctor’s appointment.”
4. Save the Blocked Time
After entering the time and details, click Save. This will now block off the selected time on your calendar, preventing any claims from being scheduled during that period.
Best Practices for Blocking Time Off
To efficiently manage your calendar and avoid scheduling conflicts, follow these best practices:
Block off entire days if needed: If you know you’ll be unavailable for the whole day (e.g., vacation), block the full 24 hours to avoid confusion.
Set buffer time: Leave a bit of time before and after your personal appointment to ensure you have flexibility for any unexpected delays.
Use clear notes: Always add a note to specify why the time is blocked, making it easier to remember the reason later.
Troubleshooting Guide
Here are some common issues you may encounter when blocking time off on your calendar and how to resolve them:
Problem 1: Unable to Block Time
Solution: Make sure you’re clicking directly on the calendar date and that the Unavailable switch is activated.
Problem 2: Claims Scheduled During Blocked Time
Solution: Double-check that you have saved the blocked time correctly and that no claims were already scheduled for that time. If claims were previously scheduled, manually reschedule them.
Problem 3: Overlapping Personal Time and Claims
Solution: If you need to block off time after claims have already been scheduled, reschedule the affected claims before marking the time as unavailable.
Frequently Asked Questions (FAQ)
Q1: Can I block off time for a whole day? A1: Yes, you can block an entire day by selecting the date and setting the unavailable time from 12:00 AM to 11:59 PM.
Q2: How do I block time for multiple days? A2: To block multiple days, repeat the process for each individual day or block off the full days using the start and end times of 12:00 AM to 11:59 PM.
Q3: Can I edit or delete blocked time? A3: Yes, you can click on the blocked time in the calendar and either edit the details or delete it if your plans change.
Conclusion
Blocking time off on your RouteX calendar is a simple but essential feature to help you manage your availability and prevent scheduling conflicts. By following the steps in this guide, you can easily block off time for personal appointments or unavailable periods, ensuring that no claims are scheduled during those times. This will help keep your calendar organized and free of overbooking.